 Community Wiki
By Nicole Yankelovich (nicole@openwonderland.org)
This tutorial is for a general audience, but it is geared towards those of us who are neither programmers nor artists. If you are not afraid to learn some basic features in a few freely available tools, you can be successful in creating attractive-looking 3D artwork for your virtual world. We'll even cover one way to make the new artwork interactive.
The key idea we'll focus on in this tutorial is modeling objects based on digital photographs. By way of example, we will be using photographs of a vintage radio graciously donated to the Wonderland community by Curtis Spencer, a vintage radio connoisseur.
Once you complete this tutorial, you should be able to create models of relatively simple objects based on your own photography.
Table of Contents
- Prerequisites
- Downloading Example Artwork
- Preparing the Photographs
- Modeling the Radio Using SketchUp
- Setup
- Match Photo
- Create the Basic 3D Radio Shape
- Add the Knobs
- Make the Knobs Separate Components (optional)
- Add the Textures
- Finishing Up
- Adding the Radio to Wonderland
- Importing the Radio
- Using the Edit Tools to Position the Radio
- Fixing the Lighting
- Adding Sound to the Radio
 |
Prerequisites#
Here's what you will need to complete this tutorial:
- Access to a running Wonderland server (v0.5 or later)
- A computer that will run the Wonderland 0.5 client (can be the same machine that is running the server)
- A copy of the example artwork (provided below)
- A copy of Google SketchUp
 (free)
- Knowledge of SketchUp's navigation tools plus the line tool, the circle tool, and the extrude tool
I suggest working through the excellent introductory tutorials that Google provides within the SketchUp application to learn the basics. You can find more training resources on the Google SketchUp web site.
Downloading Example Artwork#
Begin the tutorial by saving one of the following artwork collection files to your computer:
The first option (radio.zip) is the correct one for most Mac and Windows systems. Typically your computer will automatically prompt you to uncompress or "expand" the collection. In it you should find the following files:
- Clinton153.jpg (76 KB)
- front-texture.jpg (164 KB)
- front.jpg (164 KB)
- radio-wood-texture.jpg (48 KB)
- side-texture.jpg (140 KB)
- side.jpg (128 KB)
- top-texture.jpg (152 KB)
- top.jpg (124 KB)
You will need these files in order to complete the tutorial.
Preparing the Photographs#
This section explains what is required in terms of photographic images. If you use the example artwork, all the work of preparing the images has already been done for you, but it's still a good idea to read through this section as it explains how we'll be using each of the image files.
To be useful for modeling, the photographs must be taken at the correct angles. You will need one main photograph plus a series of others that capture each face of the object you wish to model. For the main photograph, you want to capture an image of the corner of the object. Curtis' photograph of the Clinton Vintage Antique Tube Radio is at the perfect angle:
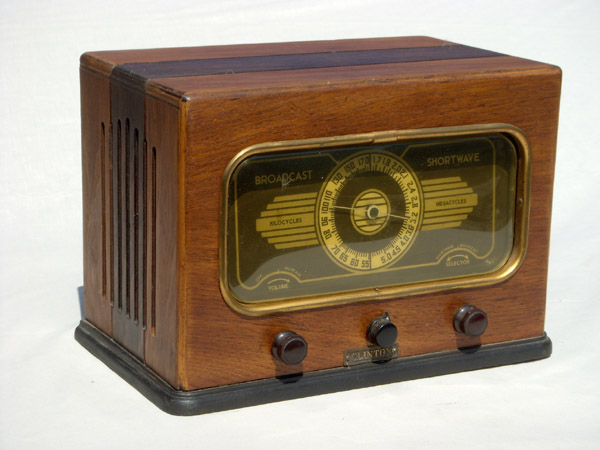 |
When we model the radio, we will use this main image as a template to create the 3D shape of the object.
While you can create a model from just a single photograph like this one, you will get the best results if you also photograph every face of the object. These photographs should be taken completely straight on. Here's the side photo Curtis provided:
 |
You'll use these straight-on images to create "textures" to apply to the faces of the 3D model in order to make the object look like the real-life object. This technique allows your objects to include realistic details, like the intricate radio dial, that would be very difficult to model in a 3D tool.
Once you have a set of photographs that includes a main image plus an image of each face, you will need to use an image editing tool like The Gimp (free) or Adobe Photoshop Elements (~$140) to clean up the images and create the texture files (this step is not necessary for you to do for this tutorial). For example, to create the texture for the side of the radio, I started with Curtis' side photo above, and then simply cropped the image to remove everything but the wood paneling:
 |
I also needed to rotate the image very slightly to get the bottom and top to be perfectly horizontal. Aside from cropping and fixing problems with skew, I only did a small amount of additional editing with the set of radio photographs. The top face photo needed some tweaking:
 |
First, the color didn't match the other faces that well. I increased the saturation and made the colors a bit "warmer" (this makes them redder). More importantly, I had to rotate the image 90 degrees so that it would import into SketchUp at the correct orientation. The final texture looks like this:
 |
The other editing I did was on the front face:
 |
I cropped the image to include only the wood paneled portion and then I used the rubber stamp tool in Photoshop Elements to remove the three black dials. The resulting texture file looks like this:
 |
I removed the dials because we're going to be creating those dials as 3D objects since we want them to stick out from the body of the radio as they do in real life.
The last thing you want to do is create one or more generic textures to use to fill in the back or bottom or other places. I created only one generic wood texture by cropping a square of wood from the side face photo:
 |
In finding an area to grab for one of these textures, try to find a spot that has a regular pattern and crop it at a place that makes sense. For example, if the texture is brick, crop right in the center of the mortar lines. When SketchUp applies this type of small texture, it will tile the texture as many times as needed to fill the face that you apply the texture to. This means you need to think about what the texture will look like when tiled.
Don't worry about making every last texture before you begin. I usually make the textures as I find I need them.
Modeling the Radio Using SketchUp#
Now that the main photograph and the texture files have been prepared, we're ready to start modeling in 3D. We're only going to be doing a few simple things in SketchUp, although there are certainly many enhancements you can do to make the model fancier. First, we're going to use the "Match Photo" tool to set up SketchUp's X, Y, and Z axis to match our photograph. Then we're going to model the radio using only the line tool, the circle tool, and the extrude tool. Then we'll apply the textures we created in the previous step.
Setup#
- Download all the radio images and put them on your desktop or in a folder on your computer.
- Open Google SketchUp
- Delete the person standing at the origin point by clicking on it and pressing the "Delete" key
Match Photo#
SketchUp's "Match Photo" feature allows you to use a photograph as a template for creating a 3D model.
- Select "Import..." from the File menu
- Navigate to the location where you downloaded the radio images. You may need to select "JPEG images (*.jpg)" from the "Files of type:" menu.
- Select the one called "Clinton153"
- Find and select the "Use As New Matched Photo" option (it's in different locations on different platforms)

- Click "Import" or "Open" to dismiss the dialog box. You'll see something like the image below. It looks intimidating, but it's not too bad once you understand what's going on.

- Locate the yellow square that's near the bottom left corner and zoom in on it

- Drag the yellow box as exactly as possible to the corner of the radio just above the molding that makes up the base of the radio (we're going to skip the base for this introductory tutorial). TIP: If you're like me, you sometimes click in the wrong place. If that happens in this mode, all the lines and boxes will mysteriously disappear. To get them back, select "Match Photo" from the Window menu. In the dialog that appears, click on the little flower-like icon to the right of the "+" at the very top of the dialog window.

- Zoom out so you can see the whole model again by clicking on the "Clinton153 (2D)" button just under the tool bar.
- Now you need to position the red and green horizon lines. Start with the dotted green lines. You move these by dragging the squares at the end of the lines. Position one along the top of the radio and one along the bottom of decorative face place, as shown in the image below. Now position the two red dotted lines along the side of the radio. As you move the lines, notice that the red and green axis lines emanating from the yellow square are aligning with the radio molding. The blue y-axis line should also be aligning with the corner of the radio. Keep adjusting the red and green dotted lines until the three axis lines emanating from the yellow square look like they are correctly aligned with the photograph. You may need to zoom in and out a number of times to check the alignment. Spend some extra time on this step. Being precise will make a big different to your eventual model.

- Click "Done" in the Match Photo dialog. The horizon lines will disappear and you're ready to start modeling.
- Now is a good time to Save your work.
Create the Basic 3D Radio Shape#
- Select the pencil tool. Start at the origin and draw a line along the green axis, ending it precisely at the right-hand corner of the radio. Continue drawing a line up the far side of the image parallel to the blue axis. End that line precisely on the top right corner of the radio. Tip: Zoom in before you click to end your line segments to be sure you're exactly on the corners.
- Complete the front face of the radio by drawing another line along the top edge of the radio and a final line along the left edge. You should now have one white face.

- In a similar manner, use the pencil tool to draw the side face. Always begin drawing your line segments at the origin when possible and remember to take advantage of SketchUps inferencing capabilities to ensure that your lines are aligned with the axes and the "from points."

- Add two last pencil lines to fill in the top face.

- Select the orbit tool and rotate your model so you can see the back where the remaining three faces should go.
- Use the pencil tool to fill in the missing lines. You should only need three more lines to enclose the 3D shape.

- Save
Add the Knobs#
- Click on the "Clinton153 (2D)" button just under the toolbar to reposition your model with respect to the photograph.
- Select "Face Style --> XRay" from the View menu to temporarily reveal the photograph behind the faces you just created.
- Select the circle tool. Position the center of the circle over the center of one of the knobs and drag outward until you get a circle approximately the same size as the knob. Be sure the hint says "on face."
- Select the arrow tool and click on the outline of the circle you just created to select it.
- Copy the circle and select paste. With the pasted copy attached to your cursor, hover over the bottom edge of the first circle. This will set a guideline at the bottom edge of the circle so that you can place the second circle precisely aligned with the first one over the second knob in the radio photo.

- Now paste again, repeating the process to get a guideline for aligning the bottoms of the circles. The photograph serves as your guide for where to place the circles. You should end up with three nicely aligned circles.

- Select the Push/Pull tool. Place the cursor over the first circle and pull 1' (Yes, one foot is very large for a radio dial! We'll fix the scale later)
- Pull the other two dials exactly the same amount. It's often easiest to get the correct value by typing it. Simply type 1' and press Enter. You should now have three radio knobs.
- Go back to the View menu and uncheck "XRay" under Face Style
- Color the radio knobs black by selecting "Paint Bucket" from the Tools menu. Select "Colors in Model" or just "In Model" from the drop-down menu. You should see a black color chip. Select this one.
- With the paint bucket cursor, click on each knob face and then the side of each knob to completely color the knob black. You may need to rotate the model to paint the sides of the knobs.
- Save
Make the Knobs Separate Components (optional)#
If you would like to add more advanced functionality to your radio using programming, or you are working with a programmer, you can make your knobs individual components so that each knob can be programmed to do a different action, such as play a different radio station.
- Click on the face of the first knob, and then shift-click on the side of the knob to select the knob's surfaces
- Right click on one of the selected surfaces and choose Select --> Bounding edges. Your whole knob should now be selected
- Select Make Component from the Edit menu and type in a Name, such as "knob-1", and click create
- Follow the steps above for the second two knobs, giving each knob a unique name
Add the Textures#
- Select "Import" from the File menu, navigate to the directory with the radio photos, and select "front-texture.jpg." Be sure to select the option that says "Use as Texture" (the placement of this is different on different platforms)
- You should see the front face of the radio attached to your cursor. Align the cursor with the origin and click and drag until your cursor is over the upper right corner of the face of the radio. The tip should say "endpoint" when your cursor is in the correct location. Don't worry if the texture does not appear to fit the face exactly. It should be close enough.

- Add the side and top textures by rotating the model so that you can see each face more or less squarely and then import the textures. You should use "side-texture.jpg" for both sides, and "top-texture.jpg" for the top.
- Now add the back texture. This is a little different since there is not a specially made texture for this face. Import the "radio-wood-texture.jpg." Instead of dragging so that the texture fills the entire face, make the texture fill just a small corner of the back face. When you lift up on the mouse button, the texture will tile and the back will look like it is made of wood strips.
- Optionally add the wood texture or a plain color to the bottom of the radio, if desired.
Finishing Up#
- Let's fix the scale of the model. First orient the model so it is in approximately the same orientation as the original photo. Now, click the Tape Measure tool. With the tape measure cursor, click on the origin of the model. Now move the tape measure up along the blue axis until you get to the top of radio. Click again. Without doing anything else, type 3' - your typing will go into the "Length" box in the lower right corner and press Enter or Return. A dialog will appear asking you if you want to resize the model. Click "Yes." While 3 feet is a bit big for a radio, this size will make it easier to find when you import it into Wonderland. You can resize it once you bring it into the world if it's too big.
- Here's what your finished model should look like:

- Save
- Select "Export --> 3D Model..." from the File menu. Now you can save your model as a Google Earth (.kmz) file (this stores the model in the Collada format). You will be able to import this type of file into Wonderland.
- Quit out of SketchUp
Adding the Radio to Wonderland#
Now that you have a Google Earth (.kmz) version of the radio, you can import the model into Wonderland and add some sound to it.
Importing the Radio#
The first step is to import the radio from your computer into a Wonderland world.
- Start your Wonderland client and log in. This tutorial requires a current 0.5 (or greater) release of Wonderland. If you do not have your own Wonderland server, you can experiment on the Community Demo server: http://owf2.virtualnorthstar.org:8080/
- Walk to the location where you want to place your radio. When you import art into Wonderland, it always appears just in front of your avatar.
- Find the .kmz file that you just saved and drag and drop it into the Wonderland window.

- If all goes well, your radio should appear in front of you.

Using the Edit Tools to Position the Radio#
- Right click on the radio and select "Edit" to get the tool palette for moving, resizing and rotating the model.

- The tool palette will appear at the bottom of your screen and the Move tools will automatically be displayed. Use the red, green, and blue arrows to move the radio.

- To rotate the model select the second tool, which is the Rotate tool. This will display three bands around the radio which you can drag to rotate in different directions. Try dragging on the green band to rotate the radio so that the front faces you.

- Now use the third Resize tool to change the size of the radio. When you click on this tool, a semi-transparent black sphere appears. You may only resize an object in equal dimensions in the x, y, and z axes. To resize, click on the sphere and drag your mouse either towards (to shrink) or away (to grow) from the center of the radio.

- Hide any of the tools you are not using by clicking again on their icon in the tool palette.
- If you are having difficulty using the tools or if you would like more precise control over the movement of the radio, click on the "Details" button to open the Details pane. The first set of numbers allows you to move the object in the x, y, and z dimensions. The second set of numbers controls x, y, and z rotation. The final field governs the scale of the object. Try using the spinners (small up and down arrows) next to each number to see how the object moves and resizes. You can also type values into the fields, which helps with precision alignment.

- When you are happy with the position and size of the radio in the scene, click on the red "x" to close the "Edit Object" tool palette window. This will close both the tool palette and the Details pane as well as hide any editing tools displayed on the object.

Fixing the Lighting#
You may notice that the radio looks quite a bit darker in Wonderland than it did in SketchUp. This is because the two programs use different lighting schemes. Follow these steps to fix the lighting.
- Right click on the radio and select "Properties"

- When the property sheet opens, you should see the "Basic" properties. If your radio .kmz file does not have a meaningful name, you can change it here.

- Click on the "Model Component" capability in the Capabilities list.

- Uncheck "Lighting Enabled" and click "Apply." This step is necessary for many models created in SketchUp since Wonderland and SketchUp use different lighting schemes.
- By turning off the Wonderland lighting, you can see the object illuminated using SketchUp lighting.

Adding Sound to the Radio#
Now for the fun part. Using Wonderland properties, you can make your radio play real music.
- Go back to the Properties dialog and click on the plus (+) sign in the bottom left corner. If you have lost or closed your properties window, right click on the radio, and select "Properties..." from the context menu and then click on the plus sign.

- Select "Audio Capabilities" and click "OK"

- The Audio Capabilities property sheet should appear

- Select URL as the Audio Source and then add this URL to the Audio Source text entry field:
http://streamer-ntc-aa04.somafm.com:80/stream/1018
- Click "Apply." If you are connected to the Internet, you should now hear music from a Soma FM Internet radio station. If you are not connected to the Internet, you can click on the "Browse" button and select any audio file located on your computer to play instead.
- Now have fun and experiment with your radio. Invite others to listen to the music with you.
- As you experiment with changing the settings in the Audio Capabilities property sheet, don't forget to click "Apply" in order for the changes to take effect. For more information on using the Audio and other capabilities, see Using Capabilities.
This material is distributed under the GNU General Public License Version 2
Add new attachment
List of attachments
| Kind | Attachment Name | Size | Version | Date Modified | Author | Change note |
|---|---|---|---|---|---|---|
png |
DragRadio1.png | 109.7 kB | 1 | 02-Mar-2011 05:08 | Nicole Yankelovich | |
png |
DragRadio2.png | 110.6 kB | 1 | 02-Mar-2011 05:08 | Nicole Yankelovich | |
png |
DragRadio3.png | 111.0 kB | 1 | 02-Mar-2011 05:08 | Nicole Yankelovich | |
png |
Props-1.png | 59.6 kB | 1 | 05-Mar-2011 20:33 | Nicole Yankelovich | |
png |
Props-2-Applied.png | 468.6 kB | 1 | 05-Mar-2011 20:32 | Nicole Yankelovich | |
png |
Props-2.png | 59.2 kB | 1 | 05-Mar-2011 20:32 | Nicole Yankelovich | |
png |
Props-3.png | 60.0 kB | 1 | 05-Mar-2011 20:32 | Nicole Yankelovich | |
png |
Props-4.png | 39.3 kB | 1 | 05-Mar-2011 20:32 | Nicole Yankelovich | |
png |
Props-5.png | 90.4 kB | 1 | 05-Mar-2011 20:32 | Nicole Yankelovich | |
png |
RadioDragToWLWindow.png | 659.2 kB | 1 | 05-Mar-2011 20:37 | Nicole Yankelovich | |
png |
RadioDropped.png | 537.1 kB | 1 | 05-Mar-2011 20:36 | Nicole Yankelovich | |
png |
RadioEditDetailsPane.png | 528.6 kB | 1 | 05-Mar-2011 20:36 | Nicole Yankelovich | |
png |
RadioEditDetailsPaneClose.png | 528.2 kB | 2 | 05-Mar-2011 20:34 | Nicole Yankelovich | |
png |
RadioEditMoveTool.png | 520.2 kB | 1 | 05-Mar-2011 20:36 | Nicole Yankelovich | |
png |
RadioEditResizeTool.png | 498.0 kB | 1 | 05-Mar-2011 20:36 | Nicole Yankelovich | |
png |
RadioEditRotateTool.png | 510.0 kB | 1 | 05-Mar-2011 20:36 | Nicole Yankelovich | |
png |
RadioEditSelect.png | 525.9 kB | 1 | 05-Mar-2011 20:36 | Nicole Yankelovich | |
png |
RadioFinished.png | 289.7 kB | 1 | 05-Mar-2011 23:40 | Nicole Yankelovich | |
png |
RadioInSketchUp.png | 106.6 kB | 1 | 02-Mar-2011 05:08 | Nicole Yankelovich | |
png |
RadioInWL.png | 54.2 kB | 1 | 02-Mar-2011 04:55 | Nicole Yankelovich | |
png |
RadioOnWall.png | 63.8 kB | 1 | 02-Mar-2011 05:08 | Nicole Yankelovich | |
png |
RadioOnWallPropMenu.png | 93.6 kB | 1 | 02-Mar-2011 05:08 | Nicole Yankelovich | |
png |
RadioPositionedInScene.png | 548.2 kB | 1 | 05-Mar-2011 20:33 | Nicole Yankelovich | |
png |
RadioPropAddAudio.png | 31.3 kB | 1 | 02-Mar-2011 05:08 | Nicole Yankelovich | |
png |
RadioPropAudio.png | 66.3 kB | 2 | 02-Mar-2011 05:07 | Nicole Yankelovich | |
png |
RadioPropsSelected.png | 440.2 kB | 2 | 05-Mar-2011 20:34 | Nicole Yankelovich | |
png |
SketchUp-3MissingFaces.png | 32.7 kB | 1 | 02-Mar-2011 05:04 | Nicole Yankelovich | |
png |
SketchUp-AddingKnobs1.png | 144.1 kB | 1 | 02-Mar-2011 05:07 | Nicole Yankelovich | |
png |
SketchUp-AddingKnobs2.png | 147.0 kB | 1 | 02-Mar-2011 05:07 | Nicole Yankelovich | |
png |
SketchUp-BackFacesCreated.png | 29.9 kB | 1 | 02-Mar-2011 05:07 | Nicole Yankelovich | |
png |
SketchUp-FrontFace.png | 93.3 kB | 1 | 02-Mar-2011 05:07 | Nicole Yankelovich | |
png |
SketchUp-FrontTexture.png | 168.0 kB | 1 | 02-Mar-2011 05:05 | Nicole Yankelovich | |
png |
SketchUp-MatchPhotoAxes.png | 195.3 kB | 1 | 02-Mar-2011 05:07 | Nicole Yankelovich | |
png |
SketchUp-MatchPhotoStart.png | 116.4 kB | 1 | 02-Mar-2011 05:06 | Nicole Yankelovich | |
png |
SketchUp-MatchPhotoYellowBox.p... | 111.5 kB | 1 | 02-Mar-2011 05:06 | Nicole Yankelovich | |
png |
SketchUp-MatchPhotoYellowBoxPo... | 109.8 kB | 1 | 02-Mar-2011 05:06 | Nicole Yankelovich | |
png |
SketchUp-Select-Clinton.png | 84.9 kB | 1 | 02-Mar-2011 05:06 | Nicole Yankelovich | |
png |
SketchUp-SideFace.png | 77.3 kB | 1 | 02-Mar-2011 05:06 | Nicole Yankelovich | |
png |
SketchUp-TopFace.png | 71.9 kB | 1 | 02-Mar-2011 05:06 | Nicole Yankelovich | |
jpg |
front-texture.jpg | 38.6 kB | 1 | 02-Mar-2011 05:05 | Nicole Yankelovich | |
jpg |
front.jpg | 73.1 kB | 1 | 02-Mar-2011 05:05 | Nicole Yankelovich | |
jpg |
radio-wood-texture.jpg | 4.4 kB | 1 | 02-Mar-2011 05:05 | Nicole Yankelovich | |
jpg |
side-texture.jpg | 18.4 kB | 1 | 02-Mar-2011 05:05 | Nicole Yankelovich | |
jpg |
side.jpg | 39.3 kB | 1 | 02-Mar-2011 05:05 | Nicole Yankelovich | |
jpg |
top-texture.jpg | 23.0 kB | 1 | 02-Mar-2011 05:05 | Nicole Yankelovich | |
jpg |
top.jpg | 33.0 kB | 1 | 02-Mar-2011 05:05 | Nicole Yankelovich |
Stuff on this site#
External OWL links#
- Open Wonderland site
- Wonderblog
- OWL forum
- Open Wonderland Documentation Wiki
- OWL on Twitter
- OWL on Facebook
- OWL on Google Code
- OWL on OHLOH
Handy wiki stuff#
- All the pages are listed in the Page Index
- Not written yet: Undefined pages
- Not linked to: Unused pages
- How to markup: TextFormattingRules
- JSPWiki core plugins
- SystemInfo
- WikiEtiquette